 How to set up your own PLUG BOARD!
Plugboards used to be more common in ye'ol internet days. They were hosted on another site, and you would just pop a bit of code onto your own site to make it display. Originally you would have to login to the host site to make edits to your board, so it was a bit cumbersome. Basically, it would allow your visitors to drop their webpages onto your page dynamically without you having to manually add sites! SO KEWL~!
Now, there is always a chance for bots or ewwy people to use the board, but this method allows you to delete any entries you do not wish to keep on your board very easily. It also has a tiny bit of spam control by not allowing users to add the same URLs multiple times, and it requires that https:// be added manually to the front of the links for bot prevention.
I've made some improvements from the old boards.
- Error messages that appear dynamically depending on what's going on
- Mild spam/bot protection
-
Buttons display in a random order each page load, so sites are seen more evenly
- Easy way to remove unwanted links
***QUICK LINKS
Here are links to the steps so you can JUMP to whatever part you need! (click a step to jump to the details)
1) Set up two files on your web host
2) Paste code into each file
3) Edit your code
4) Test out your Plugboard
5) Deleting unwanted buttons

1)SET UP TWO FILES ON YOUR WEB HOST
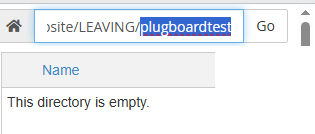
Make a folder for your plugboard on your webhost directory (the place where you store your site files, etc). You can call the folder whatever you want. Mine is called "plugboardtest" for this tutorial. The folder will start with nothing in it.
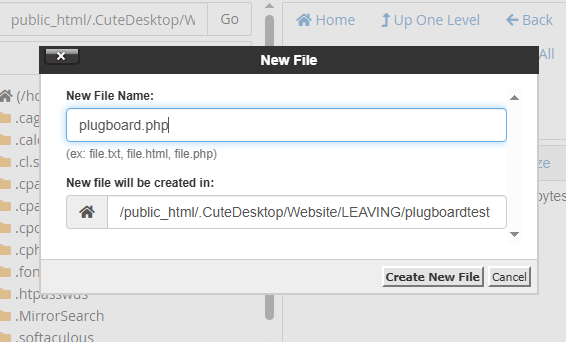
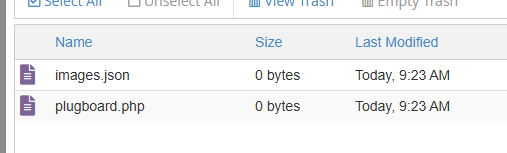
Create these two files in the folder with the following names:
images.json
plugboard.php

Your folder should have these two files with these names in it now:
2) PASTE CODE INTO EACH FILE
In images.json, paste this code: (I have pre-added 2 links for you for this tutorial. You may keep them or remove them, but one is a link to my site so it might be nice if you leave it it ^_^) If you don't want these two links, images.json simply needs two brackets in the starting file to act as a container: []
In plugboard.php, paste this code:
3) EDIT YOUR CODE
You can pretty much edit the look of your page like normal with html, css, etc. I'll point out a few things here. Just find the chunk of code in what I gave you and make your edits. Just make one edit at a time if you are starting out so you can easily go back if things mess up.
Background image:
<style type="text/css">
<!--
body {
background-image: url(PUT URL TO YOUR BACKGROUND IMAGE HERE);
background-color: #FFFFFF;
You can even edit error messages like the "invalid image URL" line. You could add little icons or rephrase the words like so: (Just be sure to keep your additions inside of the apostrophes)
$errorMessage = '<img src="CUTE ICON URL HERE"> Invalid image URL';
Image Hover Effect:
I included some code for an image hover effect that is currently "commented out" so it doesn't work by default. You would need to ctrl+f search for "zzz" in the code and remove the lines I colored green here including the /* and */
/* If you don't want your buttons to get bigger upon hovering, just remove this whole chunk down to ZZZ below */
img {
transition: transform 0.3s ease-in-out, filter 0.3s ease-in-out;
image-rendering: pixelated;
}
img:hover {
transform: scale(2); /* This adds a slight scale effect on hover */
filter: drop-shadow(0 0 20px rgba(255, 182, 193, 0.7)); /* this is the color of your glow shadow */
}
/* ZZZ */
If you only remove the green lines above and below the image hovering code, it will allow the code to actually function correctly on the page.
4) TEST OUT YOUR PLUGBOARD
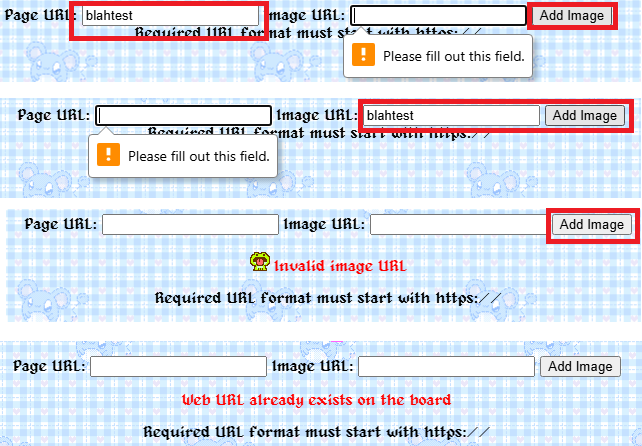
Time to see if it worked! Here are some examples of errors you might get if you don't put the correct format for images and URLs, if you only fill out one of the fields and not the other, or if a URL already exists on the board:
5) DELETING UNWANTED BUTTONS
You need to open up images.json to remove any unwanted buttons. For example, I want to remove "HOARDING" from this plugboard:

I need to remove the chunk of code between curly brackets {} that has HOARDING's button image URL, and the site URL.
PLEASE REMEMBER: The last entry in your images.json file should NOT have a comma after the end curly bracket. If you put a comma, that specific button just won't display correctly.
I really hope this helped you! Please post in the chat if you have any trouble 